Friday, September 19, 2008

Airplane Baby Bootie Pattern is now finished


Yea! I have finished the pattern. I haven't given it a name yet.


The Contest for naming the bootie will end at the end of the month, so get your name ideas sent in.


This is my first attempt making the pattern with pictorials instead of hand drawn illustrations. I hope you like it as well. It was a huge time saver for me. I am still trying to get the photos to be consistent in their light exposure.


So without further adu....

You may purchase the pattern at the link below and receive a link for an instant download. Please keep in mind that the file is large, due to so many pictures, and may take awhile to download. Just wait for it, you'll get it OK.


There are 13 pages, between the pattern and directions.


The pattern includes 7 sizes from newborn babies size 0 up to children's size 9.
So yes, you are getting a real deal at this price. $8.99


Wednesday, September 17, 2008

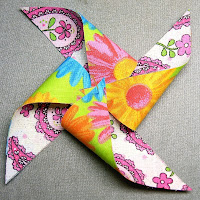
How to Make Fabric Pinwheels

These instructions are for a pair of Pinwheels 


The finished Pinwheels will be the same size as the square of fabric you use.

1. Cut out 4 squares, of the size you need.
You can use all the same fabric or different fabrics for the front and the back. You will also need to cut 2 of fusible web (fusing). The squares need to be perfectly square.

2. Line them up so you have 1 fabric piece face down. Add the layer of fusing. Now put the other fabric piece face up. Iron them together.

3. There are a couple of options for this step. I mark the cutting lines and center. Then I use Fray Check and apply it to the raw edges and on the drawn lines on both sides. I let it dry, then cut the lines.
The other way is to satin stitch all the raw edges.

4. Thread a needle and knot the thread. Insert the needle through the center dot from the back to front. Take a corner with a dot and bring it down over the needle and push the needle through the dot. You want to catch enough fabric that it won't pull out. Repeat for each of the four corners. An embellishment could be added here. (ie. a button, bead, etc.)


5. Sew the points together with a few stitches then securely sew the "propeller" to the toe of the bootie. (or attach it to whatever you have in mind)
These pinwheels can be made any size and used for a variety of things. Hung from a mobile in different fabrics for eye candy for your baby. Double them up in different sizes for a double pinwheel. Use them to replace the bow on gifts. Decorate your Christmas tree. Use a big one for a wall hanging.
These are additively easy to make and you are only limited by your imagination and your fabric stash.
Have fun...till next time,

Saturday, September 13, 2008

New Baby Bootie Design Naming Contest

I had an idea for a new baby bootie a few days ago.

It came in the form of looking at other peoples booties on the web (checking out the competition). There was a pair I couldn't quite make out the picture on and I got as close as I could. I finally figured out that one bootie was vertical and the other one was right on top of it only horizontal, like a t. But in the process of trying to figure out what kind of booties they were, I got an idea, kind of from the blurred picture.

I drew out my idea so I wouldn't forget and went to bed. I couldn't sleep, as my mind kept going over every detail on how to make it.

Here is the result of all that brain power...Lol

Presenting......drum roll.....Please......

Prop Plane / Pilot Booties / Your guess is a good as mine.

These lil' airplanes must have been kept in an old barn. They are just covered in spiderwebs. You can't even see through the cockpit windshield. They seem to be brand new and even have a soft flannel lining so little feet feel cozy in them. The pinwheel propeller is sewn on and the wings are securely sewn in. The elastic in the back is sewn in-between the layers of fabric so the bootie will stay on and be comfy. The fabrics are cotton.

Oops, one crashed...


Post your name ideas in comments so everyone can see,and I don't get duplicates of your fabulous ideas. Then send me an email with your name and email address (that way I have a time stamp too).
The person who comes up with the name I choose for the Bootie, will win a free pair of booties and the first printed pattern, signed by me (when I get it drawn and typed up).

To just go ahead a purchase a pair (several to choose from), go to www.lilbabythangs.etsy.net

The finished Bootie lengths are:

2X-Sm Preemie- 2 inches to 2 2/3 inches
X-Sm Preemie- up to 3 inches
Small - up to 3 1/3 inches
Medium- up to 3 2/3 inches
Large- 4 inches

On your mark, - get set, - GO....
.


Wednesday, September 10, 2008

Baby Bootie Pattern 5 (Sweetgrass Meadow) Pictorial Tutorial

The following are Pictorial Directions for Baby Bootie Pattern 5 (Sweetgrass Meadow).
The Pattern is available in a PDF Download for $8.99. 
Pattern fits small Preemies up to Babies with a 4-inch foot.


***Please wait after completing your purchase through PayPal, to be redirected by PayPal to your pattern.
You may then save it to your computer and print it.
You will no longer be sent an email with a link or attached pattern... unless for some reason the redirect doesn't work, which has been happening. If you aren't redirected, please email me and I will email the pattern to you as soon as I can.


Here we go...the last one in the 5 Pattern series!

1. Cut out 2 tops and 2 soles of Main fabric and 2 of lining fabric. Cut 2 ankle bands out of ribbing.


2. With right sides together, sew heel seams together on all 4 top pieces.


3. Fold ankle bands in half length-wise and sew seams. Press all seams open, unless you serged them. If serged...when you put the seams together in the next steps, fold seam allowances in opposite directions so the seams will have less bulk. In the ribbing below the seam will twist at the fold.


4. Place 1 main top and 1 lining top with wrong sides together, with the lining on the top.


5. Fold the ribbing in half with wrong sides together.


6. Place the the ankle band (cuff) inside the bootie. Pin in place so the ribbing seams and the back seams are lined up together.
Top view.


7. Stretch and sew ribbing to bootie top. You may zigzag around the seam allowance to finish if you like.
*Tip (Hack)... Tip the bootie on its side so that the pinned edges are next to your presser foot and place your presser foot in the middle on the ribbing and stretch the ribbing while sewing it to the bootie, keeping the bootie's toe out of the way as you sew the seam, it will work a lot easier than if you try to sew it from the outside.


8. Pull the cuff up so it is sticking out of the top.


9. Place soles and lining wrong sides together.
10. Pin soles to bootie with right sides of main fabric together matching toe and heel notches.


11. Sew them together.

12. You may finish the seam with a zigzag if you wish.


13. Turn right-side out.


14. You may fold the cuff down, or not!


15. OK, finish up the other bootie.


Wow! Look at that! You have completed a pair of booties. They look Fabulous!
Now, go take pictures and post them on our Flickr group to share and inspire others http://www.flickr.com/groups/lbtbabybootieart/

Monday, September 8, 2008

Baby Bootie Pattern 4 (Terra Verde "TV") Pictorial Tutorial

The following are Pictorial Directions for Baby Bootie Pattern 4 (Terra Verde "TV" Baby Bootie Pattern and Terra Verde Children's Bootie Pattern).
The Baby Pattern is available in a PDF Download for $8.99. 
The pattern fits small Preemies up to Babies with a 4-inch foot.


Terra Verde Children's Pattern in 7 larger sizes- up to children's size 7
is available in a PDF Download for $9.99


***Please wait after completing your purchase through PayPal, to be redirected by PayPal to your pattern.
You may then save it to your computer and print it.
You will no longer be sent an email with a link or attached pattern... unless for some reason the redirect doesn't work, which has been happening. If you aren't redirected, please email me and I will email the pattern to you as soon as I can.

Alright, here we go with Baby Bootie 4. This tutorial is for the basic pattern. I'll do one with the pinwheel design another time.

1. Cut out 2 Tops, 2 Backs, and 2 Soles from your main fabric. Repeat with your lining fabric.


2. Place 1 main fabric top and 1 lining top right sides together. Do the same with the backs. Sew 1/4" seam across the top of both. (You can do the other bootie too)


3. Turn right-side out and press.

The other side.

4. Sandwich 1/8" wide elastic between the layers of the Back and tacking one end at the notch.

5. Stretch elastic to the other end and pin. Sew across the elastic and tack at the other notch.


The other side.


6. Attach the shoelaces, cording, or ribbon at notches on the right side. Tack inside seam allowance as shown.


7. Fold tops over backs with the right sides of the main fabric and the right sides of the lining fabric together. Pin in Place.


8. Sew the seam.


9. Pin the other side together, the same as above.


10. Sew the seam. I usually back tack the seams at the notches where the ties and elastic meet.


11. Turn the lining side out and pull the laces out through the top.


12. Put the soles together, one main fabric and one lining fabric wrong sides together. Pin sole to bootie with right sides of main fabric together, as shown. Pin at notches first (toe to toe, heel to heel). Work from the side seam and around the heel, then ease in the toe area.


13. Sew the top to the sole starting at the side seam and working around the heel, just like you pinned it together.


14. If desired, zigzag the seam allowance.


15. Turn right side out. Tie the laces and you're done...with one.


Looks good from the bottom too!


OK! Now you can repeat the steps, and finish the other bootie.


There now you have a pair. Cute, aren't they? You're so smart!
Now, go take pictures and post them on our Flickr group to share and inspire others http://www.flickr.com/groups/lbtbabybootieart/

,

Wednesday, September 3, 2008

Baby Bootie Pattern 1 (Willow River) Pictorial Tutorial

Here is the Pictorial Tutorial for Baby Bootie Pattern 1 (Willow River). 
The Pattern is available in a PDF Download for $8.99 
*Pattern fits small Preemies up to Babies with a 4-inch foot.


***Please wait after completing your purchase through PayPal, to be redirected by PayPal to your pattern.
You may then save it to your computer and print it.
You will no longer be sent an email with a link or attached pattern... unless for some reason the redirect doesn't work, which has been happening. If you aren't redirected, please email me and I will email the pattern to you as soon as I can.


1. Cut out 2 tops, 2 backs, and 4 soles (opt. 2 of those of lining fabric)


2. Mark elastic placement lines on the wrong side of the fabric.


3. With right sides together, pin tops to back matching notches and elastic placement lines along one side.


4. Sew a seam along the pinned side.


5. Stretch and sew elastic to placement line on
wrong side of the fabric.


The other side...


6. Pin the other side together matching notches and elastic.


7. Sew seam.


8. Turn the lining end of the bootie down over the outer bootie so the wrong sides are together.


9. Place sole wrong sides together and pin to
bootie matching toe and heel notches. Be sure all
4 edges are together.


10. Sew bootie top to sole.


11. Opt. Zig-zag seams.


12. Turn right-side out.


Taa Daa! One done. Now go do the other one.


Now you have a pair.


Take pictures and post them on our Flickr Group.

.